How To Bind A Book? Top Full Guide 2022
There are many ways how to bind a book. The most common are sewing and perfect binding. The signatures are sewn together with thread in sewing, and the cover material is glued to the spine. In perfect binding, the pages are glued to cover material.
To bind a book, you will need some materials. You will need a cover, pages, a spine, and binding material. The cover can be made from any material you like, such as paper or cloth.
The pages can be made from paper, and the spine can be made from cardboard or a similar material. The binding material can be a variety of things, such as thread, yarn, or ribbon.
Contents
- 1 What is Bookbinding?
- 2 The History of Bookbinding
- 3 How to Bind Your Own Hardback Book
- 3.1 Step 1: Stack Your Paper Neatly in (at Least 4) Piles of 8 Sheets
- 3.2 Step 2: Fold Each Stack in Half
- 3.3 Step 3: Unfold the Paper and Turn Over
- 3.4 Step 4: Staple the Pages Together
- 3.5 Step 5: Glue the Binding Onto the Folios
- 3.6 Step 6: Trim the Bound Folios
- 3.7 Step 7: Mark and Cut Out the Cover Boards
- 3.8 Step 8: Make the Book Spine
- 3.9 Step 9: Mark and Cut the Material
- 3.10 Step 10: Glue the Cover Board and Spine in Place
- 3.11 Step 11: Finish the Edges of the Cover
- 3.12 Step 12: Glue the Paper Into the Covers
- 3.13 Step 13: Cut Out Your Lining Paper
- 3.14 Step 14: Glue the Lining in Place
- 3.15 Step 15: Experiment and Make Loads of Different Books
- 4 FAQ
- 5 Conclusion
What is Bookbinding?
The act of binding papers together to create an enclosed book from otherwise loose materials is known as bookbinding. The objective of this is to safeguard and secure the information contained within the bound book’s bounds.
For many reasons, bookbinding has been employed for centuries upon generations. Bookbinding is a terrific method to produce sketchbooks, diaries, books, and more from a pure craft standpoint. There are no drawbacks to studying this talent because it can assist with various crafts.
The History of Bookbinding
The practice of binding books dates back to 100 BC when palm leaves were tied together with thread. When you consider where we are now, the history of humans gathering data is a fantastic adventure. In 1250, far into the 13th century, the method of bookbinding was first documented.
Since its inception, bookbinding processes have evolved via trial and error, with variations in materials, sealed dustwrappers, and the use of fabric and ivory. The earliest use of flap-style dust jackets was in England in the 1850s, and they gradually expanded worldwide.
How to Bind Your Own Hardback Book
Step 1: Stack Your Paper Neatly in (at Least 4) Piles of 8 Sheets
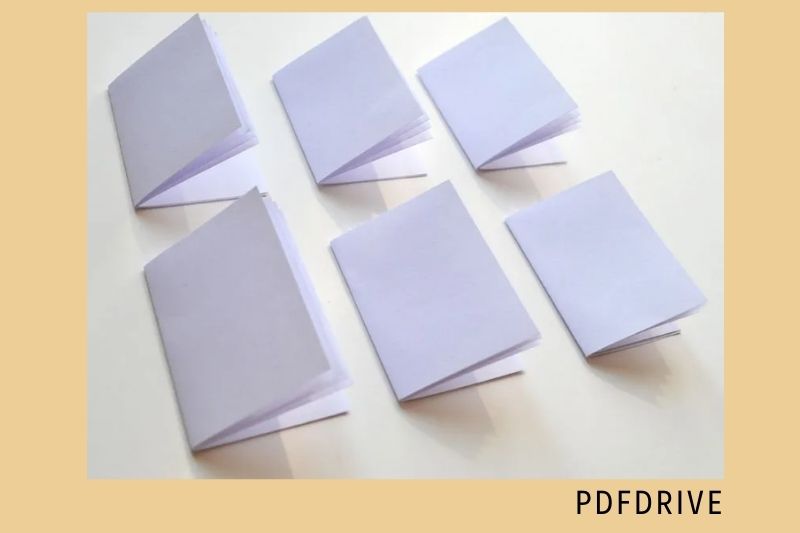
Your paper will be bound in folios of eight sheets each. Of course, you have the option of doing more or less. I’ve found that eight sheets are a nice amount. Because you’re folding it in half, each sheet will produce four pages of your book, resulting in a total of 32 pages from this eight-sheet stack.
At least four of these eight sheet folios should be included in your book, for a total of 128 pages. (I apologize to any math whizzes out there.)
Step 2: Fold Each Stack in Half
Fold each pile of eight papers in half crosswise as neatly as possible, keeping the paper as lined up as possible.
Step 3: Unfold the Paper and Turn Over
Unfold each stack of eight sheets and turn over, making sure the paper is smooth and straight.
Step 4: Staple the Pages Together
I have a long-arm stapler (“bully for you,” I hear you say), but if you don’t, don’t worry; follow these steps:
Take your stapler out of the drawer.
Place the inverted paper stack on top of an eraser (where you want to staple – approximately two inches (5 cm) from the edge of the sheet, exactly on the crease) and gently but firmly push down on the stapler until the papers are stapled.
Turn the sheets over, remove the eraser, and fold the staple ends overusing the blunt end of a dinner knife or your thumbnail, taking care not to break or injure yourself.
Rep at the opposite end of the crease until each page has two staples.
If you have a long-arm stapler like me, staple the eight-page stack twice… I knew there was a reason I needed to borrow that item from work.
Step 5: Glue the Binding Onto the Folios
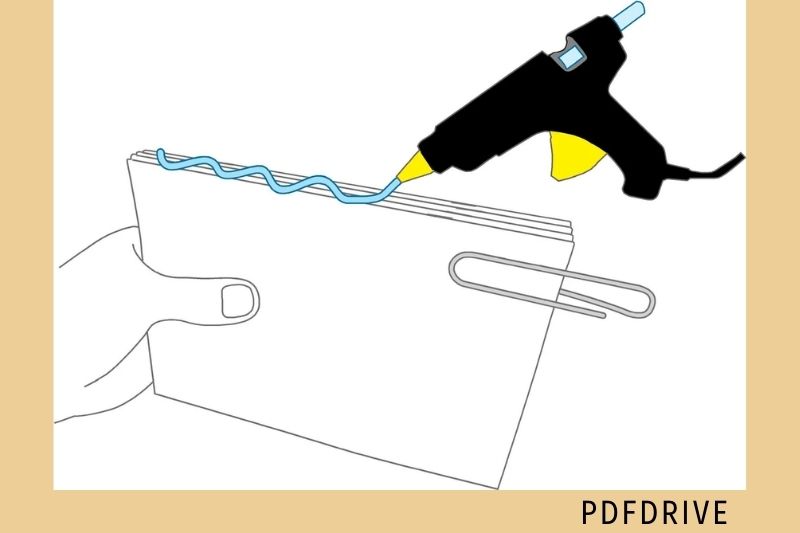
You are now going to create the book’s heart. At least four of the eight sheet / 32-page folios have been completed, and they must adhere together.
To begin, cut a piece of thin cloth the same length as the page height and around five times the thickness of all the folios that will be kept together.
Hold the folios together securely and make sure they’re all lined up. Either enlist the assistance of a buddy or use big paper clips or bulldog clips to connect the folios (or even a rubber band, I guess).
Apply glue just to the folios’ spines after they’re all neatly aligned. You may use white glue for this (it was designed for this purpose, after all), but be cautious not to let it trickle down into the spaces between the folios (maybe painting the fabric would be better.) You might also use hot melt for this step. Because hot melt is commonly used in the bookbinding business, it is ideal for this application.
Turn the wad of folios over and glue them to the piece of fabric so that some fabric peeks out on each side before it sets.
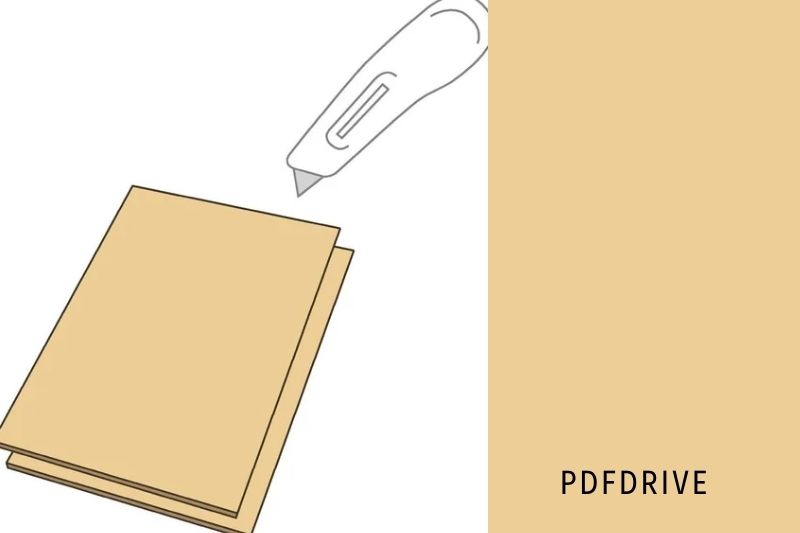
Step 6: Trim the Bound Folios
You might be able to get your bound pages trimmed by a proper guillotine at your local one-stop print or copy business, as Fugazzi said. If that fails, continue reading…
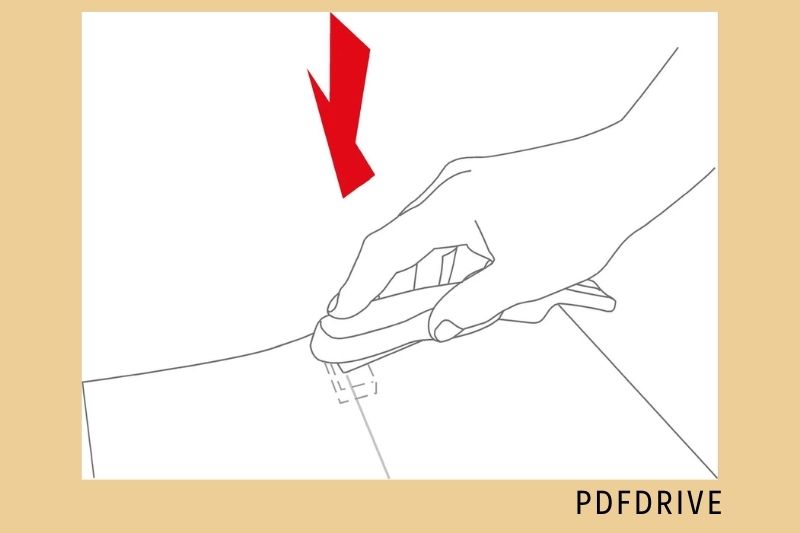
You can trim the folios a little if you wish (but you don’t have to). Be aware that the first time you do this, you may wind up making a worse mess of the paper’s edge than if you left it alone. A sharp craft knife or scalpel is required and some skill (definitely NOT something for children to do on their own).
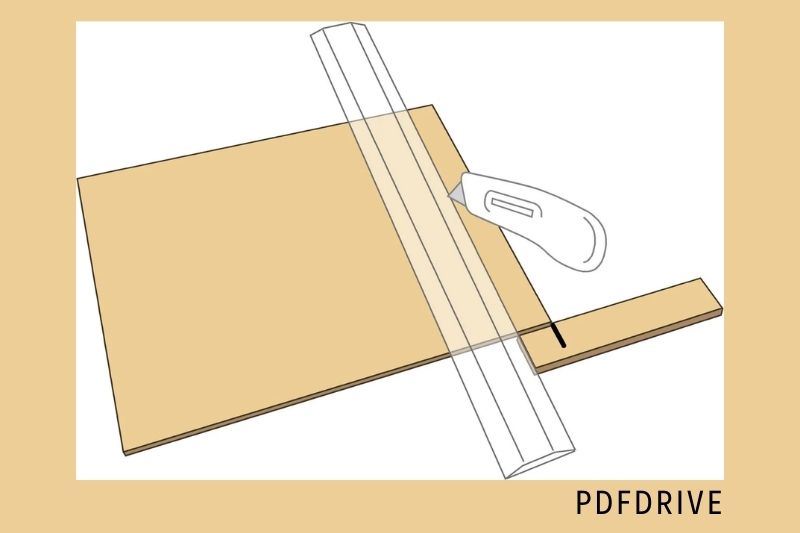
If you wish to trim, the edge opposing the binding is the most crucial to trim since when the paper is folded over, the lengths of the pages vary somewhat depending on where they are in the folio stack.
The challenge is to keep the rule steady and make several repeated cuts, being careful to cut in the same groove and ensuring that at least one layer of paper is cut from edge to edge at each cut. (BTW, I realize the illustration I made to describe this step doesn’t show this approach of trimming numerous sheets, but it’s supposed to be metaphorical anyway.)
Now is the time to utilize it if you have access to a genuine guillotine that can cut through paper stacks (for example, at work or school); it will give you the best result).
Trimming isn’t required in any way.
Trimming or not, the paper portion of the book is now complete, and it’s time to move on to the cover.
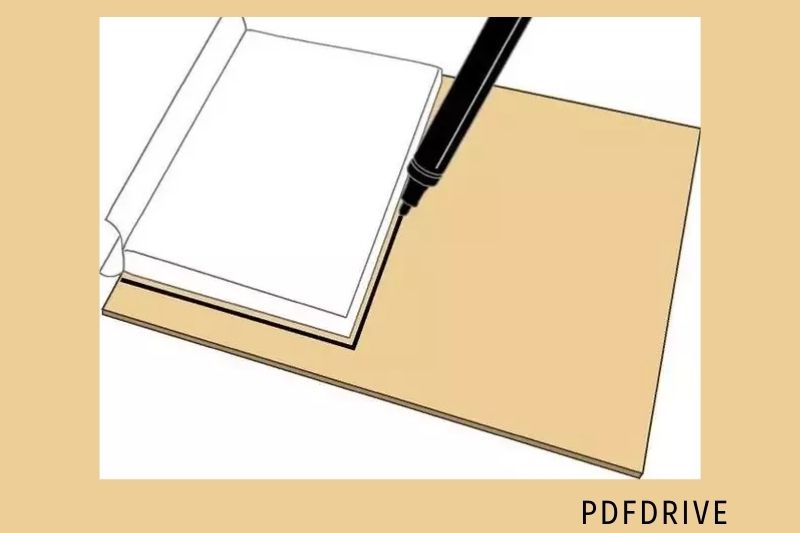
Step 7: Mark and Cut Out the Cover Boards
Place the bound folios on a piece of stiff card, aligning the bound edge with one straight edge, and then draw around the paper, leaving roughly a quarter-inch / 5 mm margin on the three other corners.
Make a replica of the card by cutting it out.
Corrugated cards and thin foam core (foamboard) work well as covers, but the rigid card used as the basis for drawing and sketching pads is the best.
Step 8: Make the Book Spine
Assemble the bound paper and coverings loosely. Measure their aggregate thickness by pressing them together and marking them on a spare piece of card.
Cut the spine to the same thickness as the covers and paper together and the same length as the book covers.
Step 9: Mark and Cut the Material

Place the book covers and spine on the back of your selected fabric or leather and trace around them, leaving a one-inch (25-mm) border all the way around.
Remove the material from the project.
As previously said, you may truly use any material you choose; however, really thick material will be tough to fold and glue (but who knows how patient or competent you are?).
I used fabric from a pair of my ex-linen wife’s (Toast) pants, thinking I’d give her the book as a Christmas present in an ironic sort of way… don’t worry, I was only joking, and she had already thrown them out.
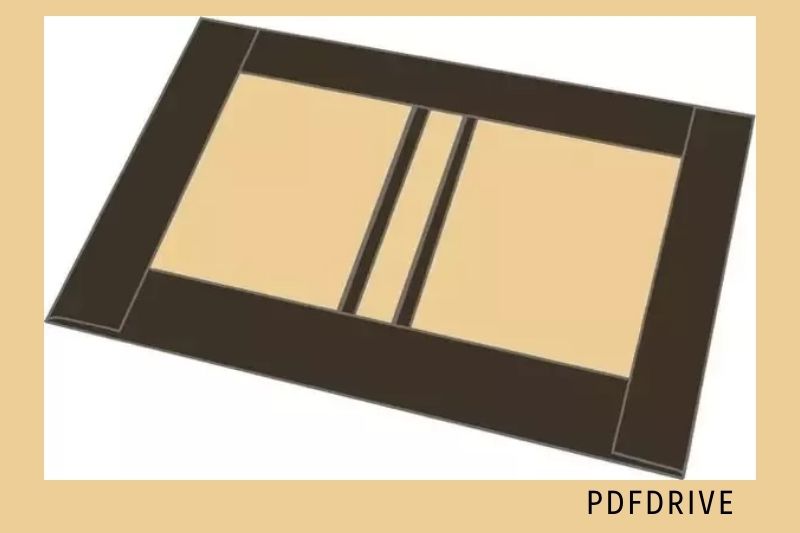
Step 10: Glue the Cover Board and Spine in Place
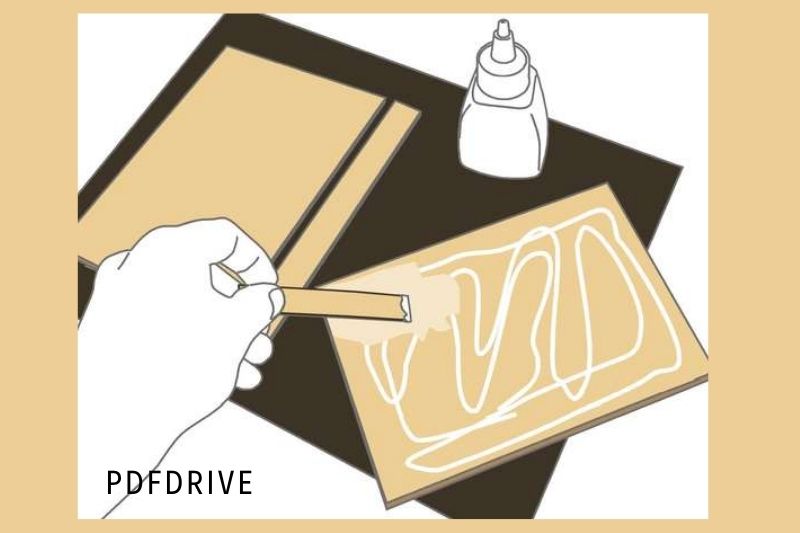
Smear an even layer of white glue or rubber solution glue over the boards and place face down on the wrong side of the material (i.e., the side of the material that you don’t ordinarily see, which has the design backward, etc.).
Make sure they’re all lined up and straight, with a gap between the spine and each of the cover boards of roughly one or two thicknesses of the card you’re using.
Step 11: Finish the Edges of the Cover
Apply a little amount of white or rubber glue around the edges of the boards and fold the material over to conceal the edges. One edge at a time should be worked on. Fold the opposing ends first, then the other sides on top so that all folds are in the same direction. Make sure the corners are tidy.
If you’re working with thick material, you may need to take away part of the material that will be buried behind the fold-over to keep the corners from becoming too bulky.
Step 12: Glue the Paper Into the Covers

Things are beginning to take form.
Apply two strips of white glue (or rubber solution glue) down the center borders of the cover boards, being careful not to get glue on the spine board.
Then, the thin cotton “wings” are bonded to the cover boards, and the bound paper wad is centrally sitting on the spine board.
The spine should not be bonded to the cotton-covered bound paper wad, but it should be attached to the cover boards right up to their ends, as this is the joint that keeps the book together and prevents the page block from slipping out.
It’s preferable to wait for this step to dry before proceeding to the next. It’s generally best to leave the book lying on its back while it dries, with the paper held by two food cans, because if you leave it closed, sections of it could stay together that you don’t want sticking together.
Step 13: Cut Out Your Lining Paper

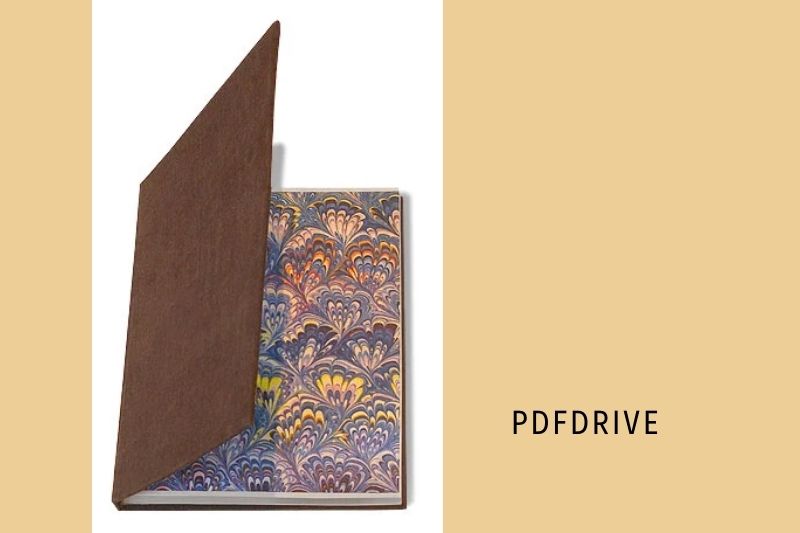
Your book is almost complete. It already functions as a hardback book, but the next stage will make it seem like a real book by covering up all of the folded-over material.
You may use practically any sort of paper for the lining material. Marbled paper was traditionally used. You can create this yourself (hey, I’m already planning another Instructable), purchase it in sheet form from most reputable craft stores, or download a sheet of marbled paper from my site (where you’ll find many other crafts like this).
You may also use a scrap of old present wrapping paper or plain old brown packing paper. Try to be as inventive as possible. The lining paper is similar to the lining of a high-end suit: it is hidden until someone opens it.
The lining paper should be a trifle smaller than the height of the paper wad so that it can be lined up properly and twice as long as the width of the paper wad so that it covers the inside of the hardcover. (Continue to the next stage.)
Step 14: Glue the Lining in Place

Crosswise fold the lining paper sheet in half.
Apply white glue or rubber solution glue to the inside of the cover and the first page.
Place one side of the folded lining paper on the glued first sheet, carefully aligning it with the paper’s edge. Fold the liner out and glue it to the inside of the cover, ensuring it fits into the corner of the connection between the paper and the cover. This will cover up all the folded-over material and the inside of the cardboard covers.
Reverse the process for the back of the book.
That’s all there is to it!
If the first piece of paper becomes wrinkled as it dries, wait at least a day for it to dry before ironing over it with a medium-hot iron altogether. It won’t get rid of all the creases, but it will make the page a lot flatter, and for the next book, attempt to use a little less adhesive.
Step 15: Experiment and Make Loads of Different Books
Make books as gifts, for school, or pals. Keep a pictorial journal; you never know, you might become famous one day.
Then consider how cool it would be if they unearthed your journal, which is not only full of angst and perceptive youthful insights into the unfairness of it all but is also embodied in a book that you made yourself, rather than some cheap (or expensive) notebook or diary that millions of other people bought from the store.
So far, I’ve made a couple more. After my niece Josie recommended that I use the pockets from the trousers for pens and other items, I built the jeans with a pocket… tidy, I thought, and it appears to work fairly well.
See what you can come up with, and if you come up with something you like, post it here or email it to me, and I’ll post it on dadcando.
Some relevant posts:
- How To Cover A Book With A Paper Bag 2022: Top Full Guide
- How To Clean Books 2022: Top Full Options For You!
- How To Pack Books 2022: Best For Shipping, Travel, and Storage
- How To Print Kindle Books: Top Full Guide 2022
- Audio Books Vs Reading 2022: Top Full Comparison
- Zoho Books Vs Quickbooks: Top Full Comparison 2022
- Book Vs Movie 2022: Top Full The Differences For You
- Ebooks Vs Printed Books 2022: Top Full Comparison
- Board Book Vs Hardcover 2022: Top Full Guide
- How To Organize Books: By Color Or without A Bookshelf 2022
- Apple Books Vs Audible 2022: Top Full Comparison
- Fiction Vs Nonfiction Books 2022: Top Full Comparison
- Comic Book Vs Manga: Top Full Comparison 2022
- Novel Vs Book 2022: Top Full Comparison
- Graphic Novels Vs Comic Books 2022: Top Full Comparison
- Apple Books Vs Kindle 2022: Top Difference Between Them
- How To Annotate A Book? Top Full Guide 2022
FAQ
What is the cheapest way to bind a book?
Ways to bind using a hole punch that isn’t too pricey
- Binding Rings are a type of ring that is used to bind documents.
- Posts that are screwed together.
- Binders with rings.
- GBC Combs are made of plastic.
- Coil made of plastic.
- Padding.
- Stapling.
- Wrap-Around Covers – These are covers that go all the way around the book (Agility)
What tools do you need to bind a book?
Bookbinding equipment
- Paper-cutter. A polished piece of bone used as a bookbinding tool is a paper-cutter.
- Scalpel. For creative bookbinding, a scalpel or scalpel knife is utilized.
- Counter made of paper. A paper counter is a hand instrument used to cut paper stacks.
- Thimbles. A thimble is a hand tool that bookbinders frequently use.
What are bookbinding needles?
Circle eye needles (also known as Bookbinding needles) are designed specifically for bookbinding and have a polished eye to decrease tread wear. Bookbinding needles, not bookbinder’s needles, are what these are called.
What curved needles?
Description of the product Curved Mattress needles are another name for curved repair sewing needles. Whether you’re a regular sewer or a crafter, they’re a must-have for any workbox. They’re ideal for stitching fabric boxes together and fixing lampshades, as well as basic repair.
Conclusion
Binding a book is a craft that has been around for centuries. It is a way to keep your thoughts and ideas together in one place. There are many ways to bind a book, but this article will focus on the most popular way, using a bookbinding machine.