Web-Loading User Experience On Windows Using ActiveX PDF
Preview Web-Loading User Experience On Windows Using ActiveX
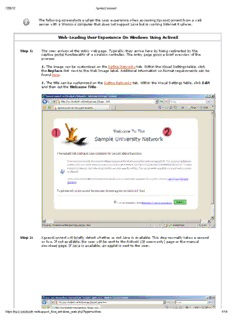
7/26/12 XpressConnect The following screenshots explain the user experience when accessing XpressConnect from a web server with a Windows computer that does not support Java but is running Internet Explorer. Web-Loading User Experience On Windows Using ActiveX Step 1: The user arrives at the entry web page. Typically, they arrive here by being redirected by the captive portal functionality of a wireless controller. The entry page gives a brief overview of the process. 1. The image can be customized on the Define Networks tab. Within the Visual Settings table, click the Replace link next to the Web Image label. Additional information on format requirements can be found here. 2. The title can be customized on the Define Networks tab. Within the Visual Settings table, click Edit and then set the Welcome Title. Step 2: XpressConnect will briefly detect whether or not Java is available. This step normally takes a second or two. If not available, the user will be sent to the ActiveX (IE users only) page or the manual download page. If Java is available, an applet is sent to the user. https://xpc.cloudpath.net/support_flow_windows_web.php?type=activex 1/14 7/26/12 XpressConnect Step 3: The user is prompted to install the ActiveX control. If the user wishes not to use the ActiveX control, a link to the manual download page is available. https://xpc.cloudpath.net/support_flow_windows_web.php?type=activex 2/14 7/26/12 XpressConnect Step 4: The user is prompted to install the application based on the certificate. If the user clicks Don't Install, they will be redirected to the manual download page. If the user clicks Install, the application loads. https://xpc.cloudpath.net/support_flow_windows_web.php?type=activex 3/14 7/26/12 XpressConnect Step 5: As XpressConnect loads, it goes through a brief initialization. The customizations below apply to the entire application. 1. The logo can be customized on the Define Networks tab. Within the Visual Settings table, click the Replace link next to the Application Logo label. Additional information on format requirements can be found here. 2. The title can be customized on the Define Networks tab. Within the Visual Settings table, click Edit and then set the Welcome Title. This Welcome Title displays both within the application and in the web pages. https://xpc.cloudpath.net/support_flow_windows_web.php?type=activex 4/14 7/26/12 XpressConnect Step 6: (Optional) If a Startup Message is defined for the network, the application displays the message. 1. The message may be specified within a network on the Define Networks tab. On the network's Summary tab, populate the Startup Message field. https://xpc.cloudpath.net/support_flow_windows_web.php?type=activex 5/14 7/26/12 XpressConnect Step 7: (Optional) If the network is defined to prompt the user for credentials, the application displays this screen. The settings below all occur on the network's Summary tab. 1. This message is specified in the Credential Text field. 2. If checked, the credentials will be submitted automatically within Windows. Select the desired behavior in the Windows Credentials Submission field. (Windows Only) 3. If desired, a Default User Name may be specified for a network. This is a good place to remind the user of their user name format, such as using '[Your University Email]' as the default user name. 4. If desired, a Default Domain may be specified. Also, the domain field may be hidden by setting the Domain Field setting to disabled. The domain field may be hidden with or with the Default Domain being populated. 5. A link may be displayed to provide the user access to a password-recovery or account-creation website. The label of the link is controlled with the Help Link Caption field. The URL is specified in the Help Link URL field. https://xpc.cloudpath.net/support_flow_windows_web.php?type=activex 6/14 7/26/12 XpressConnect Step 8: XpressConnect begins evaluating the machine. https://xpc.cloudpath.net/support_flow_windows_web.php?type=activex 7/14 7/26/12 XpressConnect Step 9: (Optional) This screen only displays if XpressConnect needs to install third-party software, such as SecureW2 or a Windows hotfix. 1. This message is specified within the setting in the Pre-Install Text field. 2. This link displays if, within the setting, the Manual Download Link field is populated. https://xpc.cloudpath.net/support_flow_windows_web.php?type=activex 8/14 7/26/12 XpressConnect Step 10: After configuration is complete, XpressConnect begins the migration to the secure network. https://xpc.cloudpath.net/support_flow_windows_web.php?type=activex 9/14 7/26/12 XpressConnect Step 11: (Optional) Once associated to the wireless network, XpressConnect will wait for the authentication to complete. This is only applicable for user-prompting EAP methods. https://xpc.cloudpath.net/support_flow_windows_web.php?type=activex 10/14
Description: