Preview Quad Cover 2003
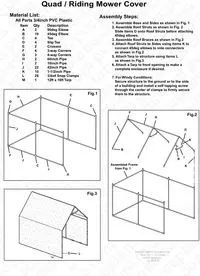
pvcpl ns.com pvcplans. m pvcp plans.com pvcplans.com s.com pvcplan pvcplans.com pvcplans.com lans.com pvcplans.co pvcplans.com om pvcpl pvcplans.com pvcplans.com pvcplans.com pvcplans.com ns.com pvcplan pvcplans.com pvcplans.com pvcplans.com pvcplans.com cplans.com pvc pvcplans.com pvcplans.com s.com pvcplans pvcplans.com pvcplans.com pvcplans.com pvcplans.com com pvcpl pvcplans.com plans.com pvcplans.c pvcplans.com pv pvcplans.com s.com pvcplan vcplans.com pvcplans.com om pvc lans.com pvcplans com pv Material List: All Parts 3/4inch PVC Plastic Item Qty Description A 2 90deg Elbow B 10 45deg Elbow C 4 Tee D 4 Slip Tee E 2 Crosses F 4 3-way Corners G 3 4-way Corners H 2 60inch Pipe I 2 10inch Pipe J 22 42inch Pipe K 10 1-1/2inch Pipe L 26 3/4x4 Snap Clamps M 1 12ft x 16ft Tarp Assembly Steps: 1. Assemble Base and Sides as shown in Fig. 1 2. Assemble Roof Struts as shown in Fig. 2 Slide items D onto Roof Struts before attaching 45deg elbows. 3. Assemble Roof Braces as shown in Fig.2 4. Attach Roof Struts to Sides using items K to connect 45deg elbows to side connectors as shown in Fig.2 5. Attach Tarp to structure using items L as shown in Fig.3 6. Attach a Tarp to front opening to make a complete enclosure if desired. 7. For Windy Conditions: Secure structure to the ground or to the side of a building and install a self tapping screw through the center of clamps to firmly secure them to the structure. A J C F J Fig.1 Fig.2 H G E C J G F J B B I D K K Assembled Frame from Fig. 1 Fig.3 L J Quad / Riding Mower Cover Assembly instructions prepared by: Dean Hunt / JCDesign
