Mast Head Knot 2004 PDF
Preview Mast Head Knot 2004
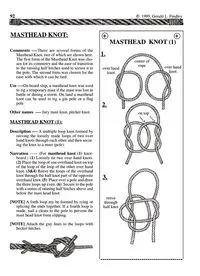
92 © 1999, Gerald L. Findley + + ---------------------------------------- MASTHEAD KNOT: MASTHEAD KNOT (1) 1. 2. 3. Comments ----There are several forms of the Masthead Knot, two of which are shown here. The first form of the Masthead Knot was cho- sen for its symmetry and the ease of transition to the running half hitches used to secure it to the pole. The second form was chosen for the ease with which it can be tied. Use ----On board ship, a masthead knot was used to rig a temporary mast if the mast was lost in battle or during a storm. On land a masthead knot can be used to rig a gin pole or a flag pole. Other names ---- Jury mast knot, pitcher knot. MASTHEAD KNOT (1): Description ---- A multiple loop knot formed by reeving the loosely made loops of two over hand knots through each other and then secur- ing the knot to a mast (pole). Narration ----- (For masthead knot (1) knot- board.) (1) Loosely tie two over hand knots. (2) Place the loop of one overhand knot on top of the loop of the loop of the other over hand knot. (3&4) Reeve the loops of the overhand knot through the half knot part of the opposite overhand knot. (5) Place over a pole and draw the three loops up even. (6) Secure to the pole with a series of running half hitches above and below the mast head knot. [NOTE] A forth loop my be formed by tying or splicing the ends together. If a fourth loop is made, nail a cleats to the pole to prevent the mast head knot from slipping. [NOTE] Attach the guy lines to the loops with becket hitches. center of rope ----> ----> on top reeve through half knot over hand knot over hand knot © 1999, Gerald L. Findley 93 + + ---------------------------------------- 4. 5. pole place over pole and draw up even secure to pole with running half hitches 6. reeve through half knot pull tight ---------> pull tight <--------- -------> MASTHEAD KNOT (2): Description ---- A multiple loop knot formed by weaving three overlapping over hand loops to- gether and then securing the knot to a mast. Narration ----- (For masthead knot (2) knot- board.) (1) Form an over hand loop near the center of the rope. [NOTE] The size of the loop is determined by the size of the pole that the finished knot is to be placed over. (2) Form a second larger overhand loop at the center of the rope. (3) Place the left edge of the second overhand loop under the right edge of the first overhand loop. (4) Form a third overhand loop. (5) place the left edge of the third overhand loop under the right edge of the second over hand loop. (6) Start weaving the over hand loops together by placing the left edge of the right overhand loop on top of the right edge of the left over hand loop. (7) Continue the weav- ing by placing the right edge of the left over- hand loop over the right edge of the center overhand loop and by placing the left edge of the right overhand loop under the left edge of the center overhand loop. (8) Finish the weav- ing by placing the right edge of the left over- hand loop under the right edge of the right overhand loop and by placing the left edge of the right overhand loop over the left edge of the left overhand loop. (9) Place over pole and work tight. The knot is prevented from slip- ping down the pole by nailing cleats to the pole or by cutting a grove for the knot to rest in. (10) Secure the ends of the rope by seizing them to the adjacent loop; two half hitches my also be used. [NOTE] A forth loop my be formed by tying or splicing the ends together. [NOTE] Attach the guy lines to the loops with becket hitches. pull tight 94 © 1999, Gerald L. Findley + + ---------------------------------------- ---------------------------------------- + + over hand loop 1. center of rope -----> 3. 2. place edge under 3rd overhand loop 4. 2nd overhand loop place edge under 5. 6. start weaving across 7. 8. 9. 10. place over pole <----- cleat cleat nailed to pole ---> -----> seizing <----- seizing --> <-- MASTHEAD KNOT (2)
